14 Multimeter Symbols and Their Meanings
They don’t make ’em like they used to. You can still pick up your grandpa’s old analog multimeter at any hardware store or on the internet, and they’ve still got their uses.
Today’s best multimeters are all digital and they dominate the market. With a numeric display that reads out your measured value as precise as can be, it’s no wonder that the old analogs have fallen by the wayside.
But what do the symbols on a multimeter mean? Don’t worry about it, we’ve got your back.
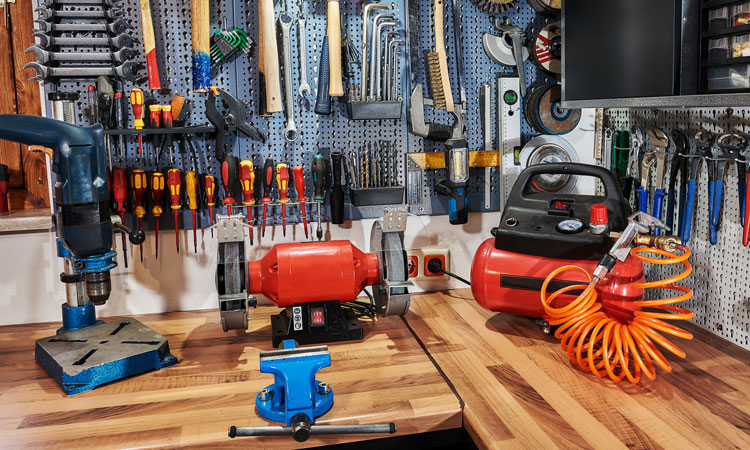
What Is a Multimeter?
Let’s start simple: a multimeter is a tool that electricians—or anybody that needs to—use to check the current (in amps), the voltage (in volts), and the resistance (in ohms), of a device that outputs electricity.
Multimeters come in analog flavors, as mentioned above, and use a needle to provide readings—but digital multimeters are far more common.
There are four primary components to a multimeter:
- The display screen where measurements taken are shown
- The various buttons that operate the tool.
- A rotary dial that allows you to select what unit of measurement you’d like to use.
- Input ports to insert your test leads into.
How Do I Read the Symbols On a Multimeter?
Fortunately, the current symbols on multimeters have been more or less standardized by one of the most popular brand of multimeters, Fluke.
The only difference that you’re likely to see between multimeters are extra symbols around your rotary dial, which you can read by using your function/shift button (#4 below).
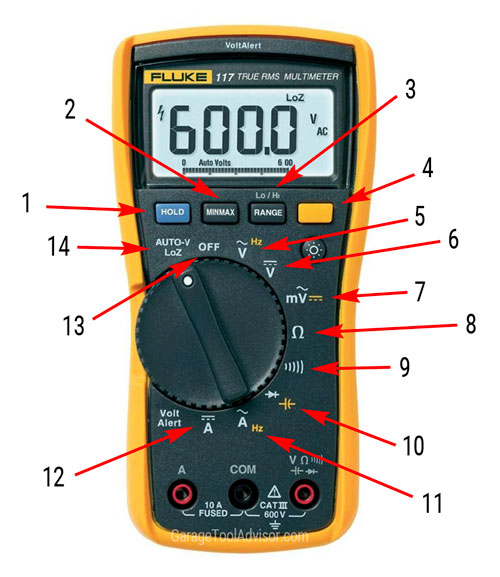
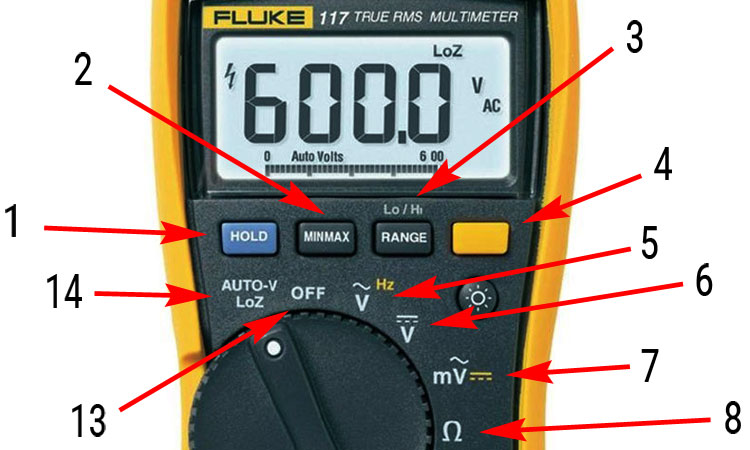
1. Hold Button
When you’ve taken your reading, you can press the hold button to lock in your measurement. This is extremely useful if you need to have the measurement on hand while you work on your project.
2. Min/Max Button
Save input values. The multimeter will beep when a high/low value is exceeded and the new value is saved.
3. Range Button
Allows you to click through meter ranges.
4. Function Button
Allows you to activate secondary functions around the dial usually indicated with yellow text or icons. Comparable to a Ctrl or Alt key on a keyboard.
5. AC Voltage
Denoted by a capital V with a wavy line on top. In a circuit diagram, however, voltmeter symbols are usually represented by a capital V inside of a circle. This is the setting that you’ll use more often than anything else, and it measures the voltage of the object that you’re working with.
6. DC Voltage
Denoted by a capital V with three hyphens above it and a single line on top of that. Think of it as a V with part of a road above it. You’ll make use of your DC voltage button when you’re measuring smaller circuits.
7. AC Millivolts
Denoted with an mV and a squiggly line on top tests smaller circuits using low AC voltage settings. Similarly, there’s the DC millivolts button, three hyphens with a straight line over them, and is usually right next to the AC millivolts button. You’d use the Function button to switch to the DC setting.
8. Resistance
Looks like an omega letter and measures ohms to help you get an accurate resistance reading. It can also help you determine whether or not a fuse has blown by displaying the letters OL.
9. Continuity
Denoted by the symbol you usually see to indicate sound waves. This measures whether or not two points have a continuity, and it’ll help you determine whether or not you have any open or short circuits.
10. Diode Test
Denoted by an arrow pointing right with a plus sign beside it. Determines whether or not you’ve got a good or bad diode.
11. AC Current
Denoted by a capital A with a squiggly line on top, which can measure the load that an object is using.
12. DC Current
Denoted by a capital A with three hyphens and a line above it. Measures the direct current of the object you’re working with.
13. On/Off Switch
Self-explanatory
14. Auto-V/LoZ
Found on some models, it prevents false measurements because of ghost voltage.
Hopefully, this guide has helped thoroughly unriddle the complex functions of a multimeter so that you can make the most of it on your next project. While this device may look complicated, if you stick to the basics, you’ll become an expert in no time.
Best Multimeters For Professional and Home Use
#1 – Fluke 115 True-RMS Compact Digital Multimeter
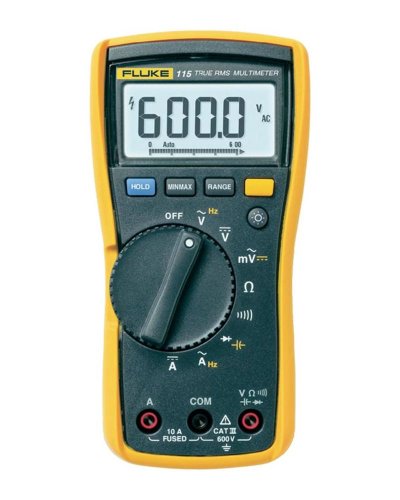 Fluke is widely recognized as one of the best multimeter brands on the market, and the 115 model is a great example. The meter is capable of performing dozens of tests, including decibel levels, resistance, and the usual assortment of AC and DC functions.
Since it includes auto-ranging, the selector switch has fewer multimeter symbols and options but more functionality than most other models. It costs a bit more than the options below, but most users agree it is well worth the investment.
One of the more remarkable design enhancements is the offset selection dial that allows you to change settings with your thumb instead of requiring both hands to make a quick change.
 The Fluke 115 has some minor disadvantages as well. One problem, and this is common in ALL multimeters, is that the digital display can be hard to read if viewed from the side or in direct sunlight.
This flaw is a result of the LCD display, and will continue to be a problem until a new type of display becomes popular.
Another common problem is that the leads which come with the unit will not fit the accessories that you can buy separately. For those, you will have to buy another set of leads, and that means adding a few more dollars to the cost of the multimeter.
#2 – Triplett 1101-B Compact Digital Multimeter
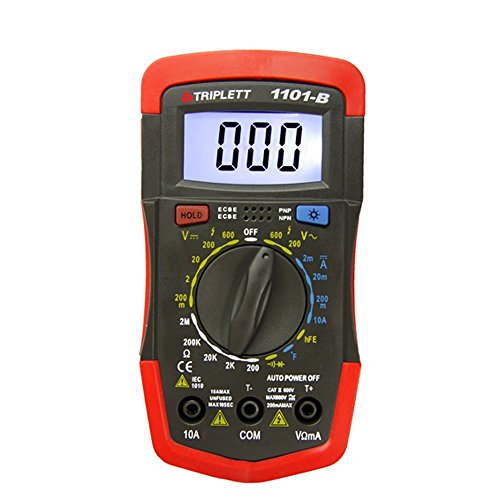 You can’t go wrong with a Triplett 1101-B. Designed to give you the most options for the least cost, this DMM even includes some functions not available with more expensive models and remains a fairly easy to use model.
There are a couple of minor drawbacks that could affect your choice, though. For example, the selector switch is hard to turn, and that can be a problem in situations where you need to change the setting with one hand, because the whole meter has a tendency to turn instead of just the selector.
Another problem, and this one is common with all low-cost DMMs, is that the support stand seems to be an afterthought and is not well-suited for supporting the DMM for optimal readout viewing.
The Triplett 1101-B will never be the equal of a Fluke DMM, but it’s one of the best multimeters you can get for the money, and has an excellent set of features.
#3 – Techpower Mastech MS8268 Multimeter
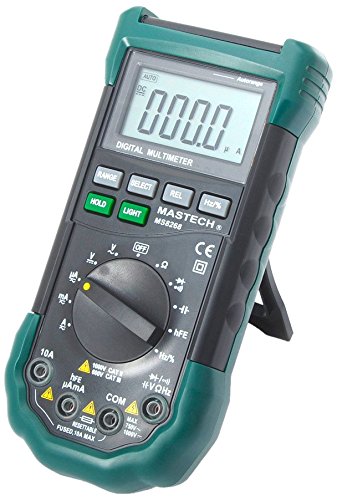 Considering that the Mastech MS8268 is very inexpensive, you might be surprised at how functional it really is. This digital multimeter allows you to use auto or manual ranging, and includes a set of functions that is unrivaled by even higher-end DMMs.
Unlike many of the top ranked multimeters, the support stand for this unit actually works quite well and allows you to position the meter for easy viewing.
On the other hand, the backlight shuts off after about 15 seconds, and that can be very annoying. On the plus side, the whole meter automatically shuts down after 10 minutes, and that can save your batteries if you forget to turn the unit off after a quick use.
You might want to buy a Fluke if you are going to use your DMM professionally, but the Mastech model is adequate enough for almost anything you would need it for in the shop or around the house.